This is part two of a five part series Drupal 7 Dynamic Content Carousel. If you haven't read part one yet, it may help to read it before moving forward - Part One - Introduction.
AJAX within Drupal
This was the part of the project I had most questions about before starting. I've worked with lots of carousels in the past so I knew it wouldn't be difficult to hook something up and even the next/previous link generation didn't worry me too much (I thought it would come down to either manually searching nodes via EntityFieldQuery or a module).
Ideally, I wanted the user to click a Next/Previous link and for the new content to load asynchronously while the carousel transition is occurring. Using libraries such as jQuery has made working with AJAX a lot easier, but I wanted to find the best Drupal way to achieve this.
Research
Drupal comes with AJAX functionality built in, it is used on some admin screens. The Drupal AJAX Framework is fairly well documented on the main Drupal website, however I've found it more useful to look for other examples online.
While browsing, found a great YouTube tutorial (and accompanying Github page) by Sean Buscay. He breaks down the task of creating AJAX driven content into understandable chunks and my solution is based on his tutorial.
I also found a tutorial on Thinkyhead that describes how the creators apply AJAX throughout an entire Drupal site. I decided not to go this route because it looked a little overkill for what I was trying to achieve and the Drupal behavior JavaScript seemed a little overly complex. I have bookmarked this page though as it may come in handy in future.
After looking around it seems that by using Drupal's AJAX framework, it's not too difficult to create AJAX driven content. The basic steps are:
- Load script dependencies (jquery.form.js, drupal.ajax library).
- Create a menu callback (this will trigger our AJAX content retrieval function in the next step)
- Create a page callback - a function which returns the dynamically retrieved content.
- Add links to the front-end which contain 'nojs' in the href and a class of 'use-ajax'.
We include 'nojs' in the href to AJAX content to act as a fallback in case the use has JavaScript disabled. If JavaScript is enabled, 'nojs' is dynamically replaced with 'ajax' and Drupal proceeds to fetch the AJAX content.
Implementation
Step 1 - Create Custom Module
First we'll need to create a simple custom module to store our code. I've called the module 'ajax_content_loader', so inside your site's 'modules' directory (ideally your custom module directory i.e./sites/all/modules/custom), create a new directory called 'ajax_content_loader' and add the following two files:
ajax_content_loader.infoajax_content_loader.module
ajax_content_loader.info contains basic definition information:
name = Ajax Content Loader
description = "A custom module which dynamically loads node content."
core = 7.x
package = Website Customisations
ajax_content_loader.info
ajax_content_loader.module is the PHP file that will store our implementation. For now, let's just create the file:
<?php
ajax_content_loader.module
We're now ready to enable our module. Navigate to the 'Modules' page (/admin/modules) and you should find the new 'Ajax Content Loader' module. Enable it.
Step 2 - Load Script Dependencies
Now that the custom module is active, we're ready to begin building (and testing) the functionality.
In order to use Drupal's AJAX functions, we need to load 'jquery.form.js' and the 'drupal.ajax' library...so let's do that.
<?php

/**
 * Load required files.
 */

function ajax_content_loader_init(){
  drupal_add_js('misc/jquery.form.js');
  drupal_add_library('system','drupal.ajax');
}
ajax_content_loader.module
Step 3 - Create a Menu Callback
Next, we need to add the menu callback. Since I want to use AJAX to generate blog pages (which will have a URL of '/blog/...'), I'm going to create the callback on blog/ajax.
I've added '/ajax' in order to prevent future conflicts with blog listing pages (which will also have a URL of '/blog').
/*
 * Implements hook_menu()
 */
function ajax_content_loader_menu(){
  // A menu callback is required when using ajax outside of the Form API

  $items['blog/ajax'] = array(
    'page callback' => 'ajax_link_response',
    'access callback' => 'user_access',
    'access arguments' => array('access content'),
    'type' => MENU_CALLBACK,
  );
  return $items;
}
ajax_content_loader.module
We've given the ajax_link_response function as the page callback, so let's now create ajax_link_response().
Step 4 - Create a Basic Page Callback Function
Here is where the bulk of our module will be written. This function is responsible for retrieving the new content which will replace existing content on the page.
Before actually writing anything, we have a choice to make...should we replace the complete page content or only specific areas. Both options have their pros and cons, however in the end, I decided to opt to replace only specific areas (main content, title and featured image) since I'll only be using this functionality on blog article pages and the structure of all article pages will be similar. It should also be a little quicker.
One downside is that admin tab links will not be dynamically updated (without also adding these to our function) but since this only affects admins, they can just refresh the page (and get updated links) if this causes a problem.
The basic layout of the function is as follows:
function ajax_link_response($type = 'ajax', $nid = 0){

  // Load the requested new node
  $node = node_load($nid, NULL, true);

  if($node){
    if($type == 'ajax'){
      // If AJAX link, search $node for the desired content and return it.
    }else{
      // Else, JavaScript not enabled, return fallback content.
    }
  }
}
ajax_content_loader.module
So let's build this out a bit. Drupal's AJAX framework comes with a set of helper commands. We'll use ajax_command_replace() to replace existing content. We'll then use ajax_deliver() to render out content to the page.
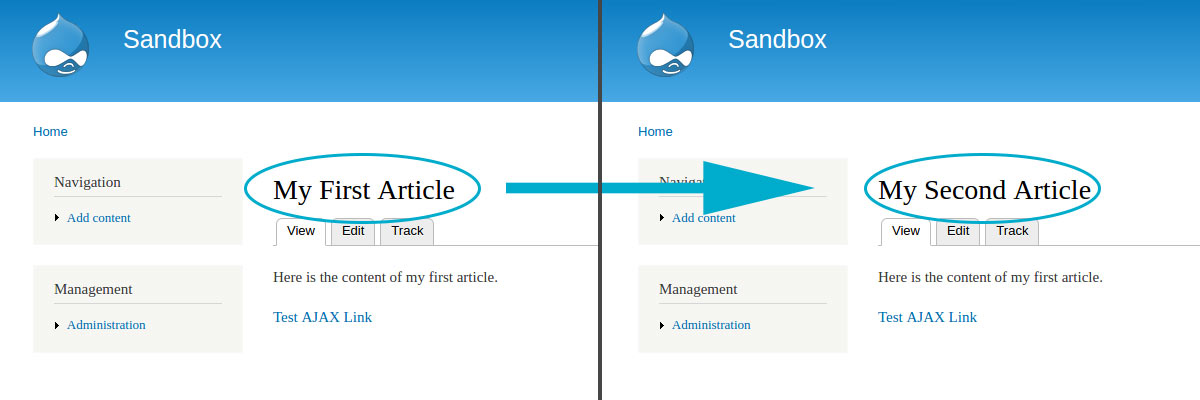
Let's update the ajax_link_response() function and dynamically update the page title.
function ajax_link_response($type = 'ajax', $nid = 0){
  // Load the requested new node
  $node = node_load($nid, NULL, true);
  if($node){

  // Use page title of $node using a helper function, we'll define this shortly
  $node_title = _ajax_content_loader_get_node_title($node);

  if($type == 'ajax'){
     // We'll create an array of commands
    $commands = array();

    // Update node title (depending on your page structure, the selectors may differ)
    // This selector works with the default 'Bartik' theme.
    $commands[] = ajax_command_replace('#page-title', '<h1 class="title" id="page-title">' . $node_title . '</h1>');

    $page = array(
      '#type' => 'ajax',
      '#commands' => $commands
    );

    // Execute commands and send the result as an AJAX response.
    ajax_deliver($page);

    }else{
      // Else, JavaScript not enabled, return fallback content.
    }
  }
}
ajax_content_loader.module
Now let's create the _ajax_content_loader_get_node_title($node) function:
function _ajax_content_loader_get_node_title($node){
  return $node->title;
}
ajax_content_loader.module
That's it. Once we have access to the new node ($node), retrieving its content tends to be quite easy.
Step 5 - Testing
Now we have a basic setup, we should test it (test early and test often). In order to do this, ensure your custom module is enabled. After this, we need to navigate to a page where we intend to use the AJAX loader. For me, this is a blog article page (I created a custom Content Type called 'Article', but you could just as easily use the default 'Basic Page' type). There has to be at least two blog articles on the site in order to test our AJAX loader (I've created 'My First Article' which has an NID of 1 and 'My Second Article' which has an NID of 2).
In the first blog article, we'll add a link which when clicked, will trigger our AJAX loader and dynamically update the page title to that of the page referenced by the link. We'll add this link into the main body of the article, just how we normally add content to a node (via the 'Edit' admin page).
We'll hard code the link since we're only testing at this phase. In the content of the first blog article, add a link similar to the following (Remember to replace '<nid>' with a relevant NID!):
<a class="use-ajax" href="/blog/ajax/nojs/<nid>"> Test AJAX Link </a>
Clear your cache then try clicking the link.
After a few seconds, the page title should update!
If you're experiencing issues, double check you're using the correct node id and that the selector in the ajax_link_response() function matches your page title (all selectors in this tutorial are based on the default Bartik theme). Also double check your menu callback ajax_content_loader_menu(). We attach ours to blog/ajax but if you have a different menu structure, this may change.
Step 6 - Update Content
After we've ensured our AJAX module is functioning correctly, we can continue building it out. Back in our custom module, we'll add more code to ajax_link_response() in order to retrieve more content from the new, recently loaded node and output it on the current page.
Let's add the node's main content:
function ajax_link_response($type = 'ajax', $nid = 0){
  // Load the requested new node
  $node = node_load($nid, NULL, true);
  if($node){

  // Helper functions
  $node_title = _ajax_content_loader_get_node_title($node);
  $node_content = _ajax_content_loader_get_node_content($node);

  if($type == 'ajax'){
    // We'll create an array of commands
    $commands = array();

    // Update node title (depending on your page structure, the selectors may differ)
    $commands[] = ajax_command_replace('#page-title', '<h1 class="title" id="page-title">' . $node_title . '</h1>');

    // Update node content (depending on your page structure, the selectors may differ)
    $commands[] = ajax_command_replace('#block-system-main > .content', '<div class="content">'.$node_content.'</div>');

    $page = array(
      '#type' => 'ajax',
      '#commands' => $commands
    );

    // Execute commands and send the result as an AJAX response.
    ajax_deliver($page);

    }else{
      // Else, JavaScript not enabled, return fallback content.
    }
  }
}
ajax_content_loader.module
All we've done is add two lines of code, one retrieves the content from $node and the other replaces the current page content. Let's define the _ajax_content_loader_get_node_content function.
function _ajax_content_loader_get_node_content($node){
  //render node content

  // If your Drupal setup prints out the title in the content,
  // uncomment the line below.
  //$node->title = '';

  $vnode = node_view($node, 'full');
  return render($vnode);
}
ajax_content_loader.module
Again, since we have access to $node, retrieving its content is relatively simple. We use Drupal's 'node_view()' function to return a renderable array containing the node content.
Save this, test it again, and now both the page title and the main content should update.
(While testing using the 'Batrik' theme, the _ajax_content_loader_get_node_content() function updated the old content with the new content...but also added the new title in the main content area. If this occurs for you too, uncomment the line of code as directed above.)
Step 7 - Custom Content
My theme uses a featured image on blog pages. I added it as a custom image field on my 'Article' content type but I won't display it as part of the main content. Instead, I'll add it as a View with a NID contextual filter and display it as a block in the page header.
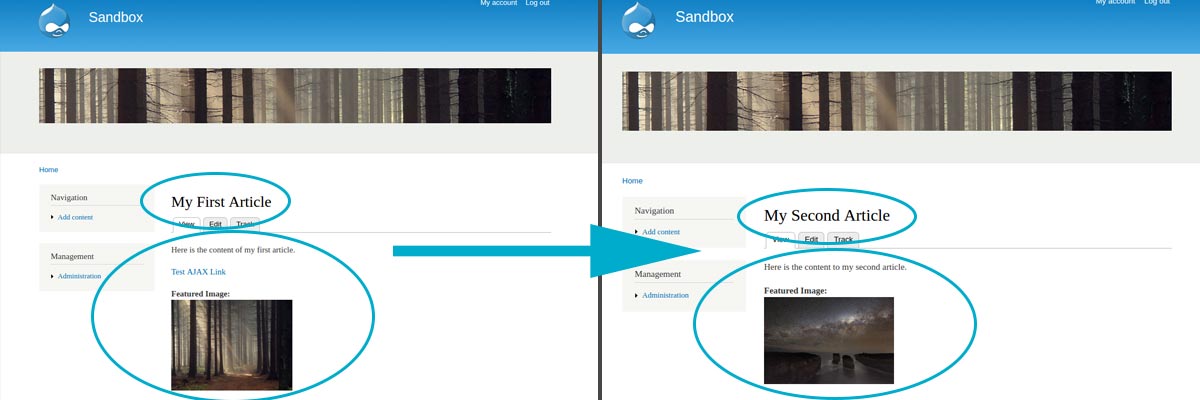
(In my real theme I've hidden the content's featured image field, however I'll leave it in these screenshots for demonstration purposes.)
As the main featured image (located at the top of the page) is not part of the main content, I'll need to add more code to ajax_link_response() in order to include this in the page update.
function ajax_link_response($type = 'ajax', $nid = 0){
  // Load the requested new node
  $node = node_load($nid, NULL, true);
  if($node){

  // Helper functions
  $node_title = _ajax_content_loader_get_node_title($node);
  $node_content = _ajax_content_loader_get_node_content($node);
  $featured_image_output = _ajax_content_loader_get_featured_image_view($nid);

  if($type == 'ajax'){
    // We'll create an array of commands
    $commands = array();

    // Update node title (depending on your page structure, the selectors may differ)
    $commands[] = ajax_command_replace('#page-title', '<h1 class="title" id="page-title">' . $node_title . '</h1>');

    // Update node content (depending on your page structure, the selectors may differ)
    $commands[] = ajax_command_replace('#block-system-main > .content', '<div class="content">'.$node_content.'</div>');

    // Update featured image view (depending on your page structure, the selectors may differ)
    $commands[] = ajax_command_replace('.view-featured-image .view-content', '' . $featured_image_output . '');

    $page = array(
      '#type' => 'ajax',
      '#commands' => $commands
    );

    // Execute commands and send the result as an AJAX response.
    ajax_deliver($page);

    }else{
      // Else, JavaScript not enabled, return fallback content.
    }
  }
}
ajax_content_loader.module
Again, simply adding two lines of code will allow us to update the featured image. Let's create the '_ajax_content_loader_get_featured_image_view()' getter function.
function _ajax_content_loader_get_featured_image_view($nid = 0){
  // The machine name of my view is 'featured_image'...
  // Update this to match your view's machine name.
  return views_embed_view ('featured_image', 'block', $nid);
}
ajax_content_loader.module
Because the featured image is a Drupal View, the helper function simply needs to return the relevant Views block. This time, instead of passing $node into the function, we only need to pass the node id ($nid) which is passed into ajax_link_response() by default.
Step 8 - Improvements
After this final step is complete, we'll now have a basic setup which will dynamically load my blog article title, main content and featured image at the click of a link. Not bad...however, there are a few minor issues.
- The URL doesn't update.
- Browser history doesn't record dynamically loaded pages.
- Page HTML meta title doesn't update.
- The AJAX link hrefs look ugly on hover (in browsers that display hrefs on hover...like Chrome).
These issues can't easily be solved using a server-side language like PHP. Thankfully, we can include an AJAX command in our module (ajax_command_invoke()) which will execute a JavaScript file. In this JavaScript file we can write whatever we want...maybe like a function that updates the URL...for example!
In this article we've set up a basic Drupal AJAX implementation...check out part three of this series if your interested in taking a closer look at how to improve our current AJAX implementation further.
As always, questions and comments below!